Anatomy of Creative's Zen Micro Audio Player
----------------------------------------------------------------------------
Source :: www.hardwarezone.comÛ -> Articles @ http://www.hardwarezone.com/articles
Date :: Monday, 13th of December, 2004
URL :: http://www.hardwarezone.com/articles/view.php?cid=9&id=1331
----------------------------------------------------------------------------
Prologue
In this installment, we'll take a break from our usual pace of product
reviews and have a closer look at the recently reviewed Zen Micro audio
player from Creative. By our definition of a closer look, we're
actually talking about a complete and comprehensive disassembly of the
Zen Micro and hopefully with this, we can all walk away with a better
understanding on the anatomy of the impressive portable audio player.
Through this detailed and documented article, we'll be able to satisfy
the curiosity of not only ourselves, but also the group of consumers
who isn't content with just using the Zen Micro as it is. Although
we're absolutely confident about the audio performance of the player,
we just feel that occasionally there's a need for us to move beyond our
usual scope of product reviews. This step-by-step disassembly guide
that we've put together is just one of many testaments to our
collective passion and appreciation of quality hardware.
Since this guide involves disassembling your Zen Micro, we have
to point out that the warranty of your Zen Micro would be considered
null and void should the disassembly be carried out by non-certified
personnel (yourself included). HardwareZone will not be held
responsible in any way should you somehow end up with an inoperable
unit either by misinterpretation of our article or in any actions of
similar capacity.
All right, serious tone of disclaimer done and over with, let's get ourselves started with the guide proper then.
 A cool black Zen Micro is the star for this disassembly guide.
|
 You'll need to prepare a 1.4mm flathead
screwdriver and a micro Phillips screwdriver. These are the only two
tools you need for disassembling the Zen Micro.
You'll need to prepare a 1.4mm flathead
screwdriver and a micro Phillips screwdriver. These are the only two
tools you need for disassembling the Zen Micro.
|
Disassembly - Step I
 Slide off the battery cover at the rear of the player to kick start the disassembly process.
|
 With the battery cover removed, you’ll now
need to extract the Li-ion battery from the player in order to gain
access to the underlying metal piece. This particular metal piece
secures the main body of the Zen Micro to the plastic housing for a
seamless assembly.
With the battery cover removed, you’ll now
need to extract the Li-ion battery from the player in order to gain
access to the underlying metal piece. This particular metal piece
secures the main body of the Zen Micro to the plastic housing for a
seamless assembly.
|
 Removing the main body from the safety of
its plastic housing is a two-step procedure. The first step involves
the unscrewing of a tiny screw hidden from sight underneath a plastic
fixture glued at the crown of the Zen Micro. This piece has to be
removed before we can move forward and to do that, we'll need to set
the player on Hold mode.
Removing the main body from the safety of
its plastic housing is a two-step procedure. The first step involves
the unscrewing of a tiny screw hidden from sight underneath a plastic
fixture glued at the crown of the Zen Micro. This piece has to be
removed before we can move forward and to do that, we'll need to set
the player on Hold mode.
|
 With the button pushed and locked in a
Hold position, the flathead screwdriver will have ample clearance for
you to pry out the plastic fixture. A gentle push of the flathead
screwdriver in the direction indicated by the arrow is enough to remove
this plastic piece.
With the button pushed and locked in a
Hold position, the flathead screwdriver will have ample clearance for
you to pry out the plastic fixture. A gentle push of the flathead
screwdriver in the direction indicated by the arrow is enough to remove
this plastic piece.
|
 A screw (circled) would be revealed once the plastic fixture has been pried off.
|
 Unscrew this tiny fastener with a micro Phillips screwdriver to complete the first step of the detachment.
|
Disassembly - Step II
 The second step is a lot simpler, but
before we move on any further, we'll need you to focus your attention
to the circled areas first. These are the areas on the plastic housing
where the metal piece latches on to secure the main body to the plastic
housing.
The second step is a lot simpler, but
before we move on any further, we'll need you to focus your attention
to the circled areas first. These are the areas on the plastic housing
where the metal piece latches on to secure the main body to the plastic
housing.
|
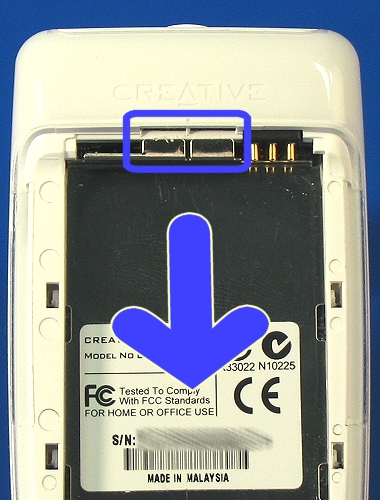 With the help of both your thumbs, press
and slide the metal piece downwards to complete detaching the main body
from the housing. You can tell by comparing the position of the metal
tooth (in the rectangular box) of this picture to the one shown above.
With the help of both your thumbs, press
and slide the metal piece downwards to complete detaching the main body
from the housing. You can tell by comparing the position of the metal
tooth (in the rectangular box) of this picture to the one shown above.
|
 With the two steps completed (the easy
part), the main body is now unlatched from the plastic housing and a
gentle push from your thumb is all you need to free the main body from
the housing.
With the two steps completed (the easy
part), the main body is now unlatched from the plastic housing and a
gentle push from your thumb is all you need to free the main body from
the housing.
|
 The main body (on the right) contains the
circuit board, the one-inch hard drive, LCD and touchpad. This entire
piece is composed of a few components assembled together.
The main body (on the right) contains the
circuit board, the one-inch hard drive, LCD and touchpad. This entire
piece is composed of a few components assembled together.
|
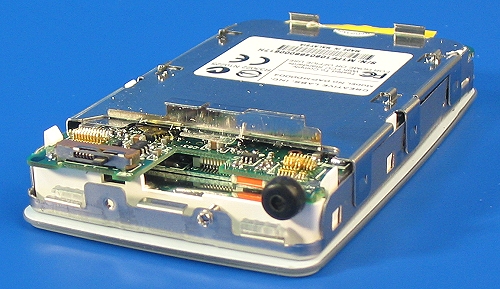 Here's a look at the main body in another angle. The black little nub you see is the on-board microphone.
|
 Do pay extra attention to these
microconnectors (highlighted by the red square boxes) as they are
extremely prone to breakages if caution is not exercised.
Do pay extra attention to these
microconnectors (highlighted by the red square boxes) as they are
extremely prone to breakages if caution is not exercised.
|
Disassembly of the Main Body (Part I)
 The next step is to remove the metal
fastening piece so that we can reach the underlying circuit board.
Three pairs of legs (three on each side as indicated by the arrows)
would have to be pried out of their sockets to accomplish this.
The next step is to remove the metal
fastening piece so that we can reach the underlying circuit board.
Three pairs of legs (three on each side as indicated by the arrows)
would have to be pried out of their sockets to accomplish this.
|
 You'll need to carry out the prying process on the three legs on the other side as well.
|
 The delicate circuit board of the Zen
Micro will be revealed once you have the metal plate removed. Do
remember to ground yourself before you touch the sensitive circuit
board. A simple way to ground yourself is to touch the metallic casing
of your computer.
The delicate circuit board of the Zen
Micro will be revealed once you have the metal plate removed. Do
remember to ground yourself before you touch the sensitive circuit
board. A simple way to ground yourself is to touch the metallic casing
of your computer.
|
 Push all six catches that are clamping the circuit board in place outwards to proceed with the disassembly of the circuit board.
|
 Do not flip up the circuit board in one quick motion as there's a flex ribbon cable attached underneath the board.
|
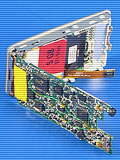
 Here's a look at the ribbon cable and its
connector. You'll need to unplug this cable (in the direction of the
arrow) in order to flip the circuit board over. Underneath this PC is
the elusive 5GB one-inch hard drive.
Here's a look at the ribbon cable and its
connector. You'll need to unplug this cable (in the direction of the
arrow) in order to flip the circuit board over. Underneath this PC is
the elusive 5GB one-inch hard drive.
|
Disassembly of the Main Body (Part II)
 A Seagate 5GB ST1 one-inch hard drive is
revealed after the ribbon cable has been safely unplugged and with the
circuit board fully flipped opened. A Samsung 16MB SDRAM module can be
found soldered onto the board as a buffer for the Seagate hard drive
when the Zen Micro is playing back digital audio files.
A Seagate 5GB ST1 one-inch hard drive is
revealed after the ribbon cable has been safely unplugged and with the
circuit board fully flipped opened. A Samsung 16MB SDRAM module can be
found soldered onto the board as a buffer for the Seagate hard drive
when the Zen Micro is playing back digital audio files.
|
Note: for the MP3-player project, you are recommended to stop here.
You should be able to examine the circuit board and identify some of the ICs. We will leave the drive and display where they are.
 Insert the tip of the flathead screwdriver beneath the corner of the hard drive…
|
 …pivot the screwdriver on the metal casing and the Seagate hard drive can be jacked out of its cavity easily.
|
 You can pull out the interfacing data pins easily with the hard drive completed extracted.
|
 The Seagate ST1 5GB is a one-inch hard
drive specially designed for handheld consumer electronics devices such
as the Creative Zen Micro. This very same drive can also be found in
another hard disk based MP3 player, the Rio Carbon.
The Seagate ST1 5GB is a one-inch hard
drive specially designed for handheld consumer electronics devices such
as the Creative Zen Micro. This very same drive can also be found in
another hard disk based MP3 player, the Rio Carbon.
|
Disassembly of the Main Body (Part III)
 A Synaptics controller chip is used for
the touchpad of the Zen Micro. This chip is found in the cavity used to
sit the Seagate ST1 hard drive. North of this chip is the LCD block of
the Zen Micro and like the pieces disassembled so far, the display
block is designed to be removable as well.
A Synaptics controller chip is used for
the touchpad of the Zen Micro. This chip is found in the cavity used to
sit the Seagate ST1 hard drive. North of this chip is the LCD block of
the Zen Micro and like the pieces disassembled so far, the display
block is designed to be removable as well.
|
 The LCD can be easily taken out without the assistance of a tool.
|
 And finally we have the Zen Micro successfully disassembled and neatly lined up.
|
 We leave you with this plan view of all
the nine pieces of the Zen Micro we have disassembled and we hope that
you have enjoyed this step-by-step guide as much as we did in putting
it together.
We leave you with this plan view of all
the nine pieces of the Zen Micro we have disassembled and we hope that
you have enjoyed this step-by-step guide as much as we did in putting
it together.
|
Discussion of article at http://forums.hardwarezone.com/showthread.php?p=12241988
|